

AutoCAD Tips & Tricks
Today's Tip
Copy and Move without commands
 You can copy or move objects without using any commands!
To move an object select it once, then click and drag it (not the grips) to move it to wherever you want. Release the mouse button to drop it.
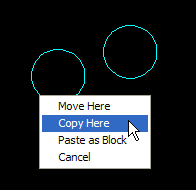
To copy an object, select it once, then right-click and drag it. When you release the mouse button, you are presented with a menu, allowing you to Move, Copy or Paste as Block.
Yesterday's Tip
Moving vertically in 3D

Moving objects vertically always used to be a bit of a chore with AutoCAD, usually involving some relative coordinate entry for the Z direction or maybe the .XY filter. Fortunately, AutoCAD 2007 introduced a new command that makes moving objects vertically a snap.
 You'll find the 3D Move button on the Dashboard or Modify
![]() 3D Operations
3D Operations![]() 3D Move from the pull-down menu.
3D Move from the pull-down menu.
As with the normal Move command, you're first prompted to select objects. Once a selection is made, the cursor changes to the move grip tool. Now, pick any point on the base plane to fix the move grip tool at that elevation. Next, hover your cursor over the blue axis handle (Z axis) until it changes to a gold colour and left-click. This has the effect of constraining movement in the z direction. All you need do now is enter the distance you want the object to be moved or use the mouse to pick a distance.
Saturday's Tip
Dashboard's hidden depths
Did you know that there's more to the Dashboard than is apparent on the surface? When I first started working with it, I thought, "wouldn't it be great if all the 2D drawing tools were on there as well". Fortunately, they are. All you need to know is how to get at them.
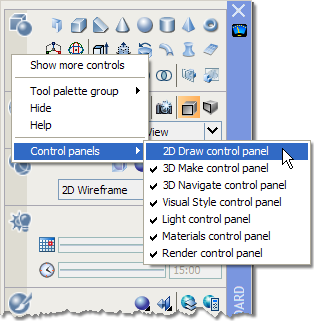
Simply right-click on any part of the body of the Dashboard (not the vertical title bar) and select "Control panels" from the menu and then click "2D Draw control panel". You should see that the Draw and Modify toolbars are added as a new panel to the top of the dashboard.
Now you can keep your work area cleaner when using the 3D Modeling Workspace.
Friday's Tip
AutoCAD Alias Editor
 If you're new to AutoCAD or even if you're not and you find it difficult to remember all the keyboard shortcuts to your favourite commands like L for Line and C for Circle or even 3DO for 3DOrbit, then you need to know about the AutoCAD Alias Editor.
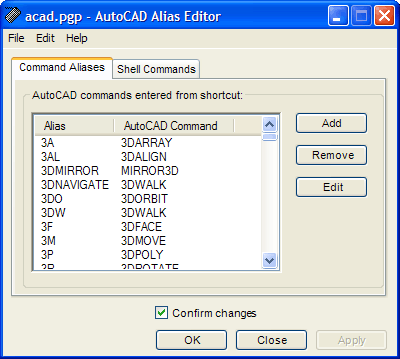
Enter ALIASEDIT at the command line and AutoCAD will launch a tiny application window that lists all the shortcuts in alphabetical order. As this is a seperate application, you can keep it minimised on your taskbar until you need it for reference.
Essentially, this editor simply lists the contents of the acad.pgp file where all the command aliases are stored. Those of you who are a bit more adventurous, may even like to use the Alias Editor to create your own aliases or edit existing ones.
Thursday's Tip
Extend/Trim commands
While in the middle of either of the Trim or Extend command, you don't have to exit out of one to start the other; they're virtually the same command. So if you're using Trim, and need to Extend, simply hold down the SHIFT key and it will convert to the Extend command, and vice-versa.
Wednesday's Tip
DWG TrueView
![]() Quite often, you need to share your AutoCAD drawings with co-workers or others who don't have a copy of AutoCAD. In the past, this meant either providing drawings in DWF or buying some special viewing software. Well, now you can share your drawings files in DWG format for free.
Quite often, you need to share your AutoCAD drawings with co-workers or others who don't have a copy of AutoCAD. In the past, this meant either providing drawings in DWF or buying some special viewing software. Well, now you can share your drawings files in DWG format for free.
Autodesk's own DWG TrueView application is free to download and install, and it looks just like AutoCAD. Co-workers without AutoCAD can not only view your drawings but they can plot them too and publish them as DWF. See here for more information.
Tuesday's Tip
Selection Preview Cycling
 Making positive selections is much easier now that AutoCAD highlights (previews) objects as you mouse over them. However, it can still be difficult to select the right object when drawings become complicated with lots of overlapping objects. Fortunately, AutoCAD allows you to cycle through all the overlapping objects under the cursor.
All you need to do is hold down the Shift key and then repeatedly hit the Spacebar (Shift + Space). Each object under the cursor will be highlighted in turn and you can easily pick the one you want.
You can use a similar technique to cycle through sub-objects such as faces and edges on 3D Solids. To cycle through sub-objects, hold down the Control key and hit the Spacebar repeatedly (Ctrl + Space).
Tutorials of the Moment
The most recently viewed tutorials
Stage 3: Create Surfaces
|
The Material Editor
|
|
Last visited: less than one minute ago |
Last visited: 3 minutes ago |
|
Entering Survey Data using AutoCAD
|
Stage 9: Replace blocks for Lamp Posts and Trees
|
|
Last visited: 3 minutes ago |
Last visited: 5 minutes ago |
Local Navigation
Tutorials
Helping you to learn more of the skills you need, for free.
Featured Tutorial:
![]()
CADTutor tutorials are comprehensive lessons, designed to give you a deeper understanding.
Total tutorials: 108
Michael’s Corner
Michael Beall shows you how to work smarter and faster.

Each month, Michael’s Corner presents a series of useful articles that help you use AutoCAD more efficiently.
Total articles: 592
Sponsored Links


