AutoCAD Tips and Tricks
This week's tips
Our community members love sharing their knowledge. Many of them have years of experience and have solved many CAD problems across a range of industries. These tips are just as useful whether you're just starting out with AutoCAD or whether you're a seasoned professional always willing to learn new skills.
Submit your own tip
If you have some great AutoCAD tips that you'd like to share here at CADTutor, just sign up to our forum and post your tip in the Tutorials & Tips'n'Tricks section. We'll take it from there.
Today's Tip
Maximize your work area
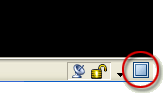 You can use Ctrl+0, or go to , or click the faint blue square icon at the very bottom right of the AutoCAD program window to maximize your entire work area. The only thing that will show is your top Pull-down Menu, your Command Line, and/or your Layout Tabs, maximizing the drawing area as much as possible. Of course, you could also turn off the command line and just work with Dynamic Input if you wanted to be even more minimal. These command options work as a toggle, so simply repeat the action to restore the full interface.
If you are a customized keyboard command type of person, the command is CLEANSCREENON and CLEANSCREENOFF so you can easily add it into your ACAD.PGP file complete with your personal Command Alias.
Yesterday's Tip
Layer States and Viewports
Did you know that Layer States can be saved and used to control visibility of layers per viewport? If you create and save a couple of layer states within an active viewport, you can then toggle them back and forth without affecting any other viewports, or model space. The changes only occur within the active viewport.
Try this:
Create a bunch of random objects in model space on different layers. Now switch to paper space and create two viewports so that you can see all the model space objects in both viewports. Now activate one of the viewports and open the Express Tools LMAN layer states manager. Create and save a new layer state. Now close LMAN and freeze some of the objects within the viewport. Open LMAN back up and create another new layer state. All of this must be done within the active viewport. You can now toggle back and forth between the two layer states within the active viewport without affecting model space or any other viewports. You can also switch to another viewport and use the same layer states on it, or create new ones.
Monday's Tip
Easily set properties for multiple blocks in Tool Palettes
Lots of people think that when you have blocks saved in a Tool Palette, you have to each individual block to apply custom settings. What if you have 20 blocks and you want them all to have the same setting? Well, just hold the Ctrl key and highlight the blocks you want within the Tool Palette, then right click on any of the selected blocks to apply global settings.
Also, you can hold the Ctrl key to select your first block, then hold the Shift key to select the last block, then right click on any of the selected blocks to apply a global settings. Makes things much easier than one at a time.
Sunday's Tip
Absolute and Relative Coordinates
| Coordinate | Interpretation |
|---|---|
| 25,75 | depends on context |
| @25,75 | relative |
| #25,75 | absolute |
It used to be very simple. Enter a coordinate and AutoCAD interpreted it as an absolute coordinate. Enter a coordinate preceded by "@" (the at sign) and AutoCAD interpreted it as a relative coordinate. This simple rule changed when dynamic input was introduced and now the interpretation of coordinates is contextual. For example, when you draw a rectangle using RECTANG, the coordinate for the second point is interpreted as absolute with dynamic input turned off and as relative with dynamic input turned on. Really, try it and see.
Fortunately, there's a new coordinate prefix that forces an absolute coordinate, even when AutoCAD decides you want a relative one. Precede any coordinate with "#" (the hash sign) to force an absolute coordinate.
Saturday's Tip
Quick Extrusions with Presspull
 As of AutoCAD 2007, there's no need to draw closed shapes before extruding. The Presspull tool will find any enclosed area (just like BHATCH) and extrude it.
Any objects can be used as boundaries; lines, circles, splines, they all work. This makes building 3D solid models much quicker than before.
Friday's Tip
Object snap tracking
 Finding the centre (centroid) of a square or rectangle used to require the use of at least one construction line but with object snap tracking, the same point can be found without having to draw any other objects.
This technique relies on the fact that "Midpoint" is set as one of your running object snaps and that polar tracking (POLAR) and object snap tracking (OTRACK) are on. Say you have a square and you want to draw an inscribed circle. Start the circle command and then hover the cursor over one of the vertical sides of the square until the midpoint snap icon appears. Move towards the centre and a dotted tracking like will appear. Next, hover the cursor over one of the horizontal sides of the square until the midpoint icon appears, again, move towards the centre of the square. This time, when you get close to the centre, both horizontal and vertical tracking lines appear and you can snap to the intersection simply by left-clicking. Finish the circle by snapping to any midpoint.
Thursday's Tip
AutoCAD 2007 - Where's my old XREF Manager?
 A lot of people using AutoCAD 2007 and above don't like the new XREF Manager, so here's a simple way to get the old one back.
AutoCAD 2007 introduced a new way to manage XREFs and to bring up the "old" XREF Manager, you have to type CLASSICXREF at the command line. Well, if you want things back the way they were and use the classic XREF Manager as the default from the keyboard and from the menu, a few adjustments will get you there…
First, go to . This command opens the ACAD.PGP file in Notepad. This is where all the keyboard shortcuts are defined.
Next, scroll down until you see XR (or use ), change the value from *XREF to *CLASSICXREF and save (). Close Notepad and return to AutoCAD. Enter the command REINIT, check the "PGP File" checkbox and click "OK". That fixes the keyboard so that next time you type XR, you'll see the old manager and not the new one.
To change your Menu, type CUI at the command line. In the "Customizations in All CUI Files" pane of the "Custom User Interface" dialogue, go to and click on it once to highlight it.
Now, in the "Properties" pane, change the "Macro" setting from ^C^C_externalreferences to ^C^C_classicxref, click "OK" to save the changes and you're done.